Sunday 17 January 2016

The acorn story – part 4

Keeping a blog is not a simple task, at least not to keep blogging regularly. So here I am 9 months later trying to pick up where I left my acorns last time.

They had just started to grow green leafs. The root system was enormous and they were ready to be planted. I carefully picked them up from their small acorn vases and studied them thoroughly.

One of them was cracked open and showed the green nut and a tiny stem growing from the top of it. I did some pencil sketches and a rather quick color sketch as well. Enlarged a couple of times.
And yes, I’m still not confident or happy with the green leaf, I really got to learn how to paint green leafs!


I then planted my plants in plastic pots so they would not dry out to quick. A ceramic pot is much better looking and suitable (at least according to me) but they were to be standing in my west facing window with lots of sun in the afternoon. So plastic it was.

The acorn that sprouted in the wrong end (and then in the right end after some time) did not last for so long. It had probably put too much energy to reverse its growing so it was drained when it actually got a pot with soil.

The other one thrived. It grow and produced lots of green leafs. First one round of 4 leafs. Then it grow a bit more and had one little leaf and then 5 more healthie looking bright green leafs at the top. I did not paint them.

I managed to keep my oak over the summer before it started to look a little bit unhappy. Then it got some sort of fungus on the leaf, they become brown and white speckled. I tried to wash the leaf, to clean of the fungus. I gave it more water and for a short period of time it looked like it was going to recover. But no. One after another the leaf started to fall. And soon it was just the tiny lonely leaf left and tow curled up leafs at the bottom of the pot.

The one leaf was only a little green, and the two fallen was brownish and covered with the white fungus – that’s when I started to paint leafs!

To paint the fungus, or mildew, I had to experiment a bit. I tried different color mixes. But to my surprise I ended up using gouache.

I am one of those water color "fanatics" who don't use body color. All my painting life I have avoided it and never failed an occasion to tell other that I don't use body color! It was really important to me. But hey, old habits are to be broken :-) So I bravely went to the artist shop and bought one tube of Winsor & Newton Designers gouache, Zinc white.

After some testing I mixed my white with a tiny hint of Cobolt blue, and used it at the very end of the painting. I'm not entirely sure it was the best solution for mould painting. But I have overcome a mental barrier, and that is always a good thing!


The only thing left now was to uproot the oak. I let it dry well and then carefully removed all the soil to unveil the root system to see how it looked now. It was brown as before but a bit thicker than when I planted it, it was almost the same.

My acorns grow in small round vases, so the root system came out in circular forms. My first thought was to draw them in that fashion, but I decided to do some research about oaks growth habit first.
And I learned that they have a taproot!
So I straighten it out in my mind and draw it that way. Actually a lot easier than the swirled one, but the format of this picture is rather hopeless… When I straighten out the root with my hands it was about 50 cm long, and really really thin in the end.

I am wondering if the small pot was a problem, if an oak usually have a taproot it must require quite some space underneath itself.

So, the acorn adventure lasted for little more than a year. And I must say it have been fun and exciting to watch the whole process from an escaping larva, over sprouting root and green leafs to a dead and dry nut.
Try it! I’ll do it again next autumn – I have two acorn vases that I have to put to use!

Sunday 9 August 2015

Laburnum seedpods

About the present
I haven’t been at my dump as much as I had hoped this year. But this blog is also about my botanical painting adventures (it just become that...), not just the adventures at the dump. So here we go! 

Laburnum 
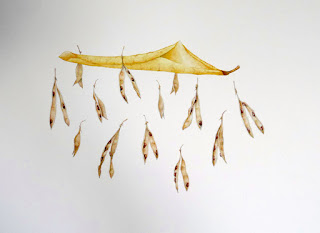
I have wanted to paint laburnum seedpods for some time now. Last year I picked a lot of them and they have been hanging on my wall all the time under the watchful eye of artist Helene Schjerfbeck. But I did not know how to paint them. As they are, huh – that would be tricky. I lay waken in the nights and pondered. 

In Swedish laburnum is called Gullregn, gull (guld) = gold and regn = rain. I like to paint curled up rhododendron leafs, and at a certain point they are golden – so why not let the laburnum seedpods rain down from a golden rhododendron leaf! 

First I did some color testing and to get to know the ins and outs of the seedpods.  Less Raw Sienna and more Burnt Umber was the solution, and go easy with the gray.

I then went on with drawing the rhododendron, easy bit, done it before. Then I took one bundle of laburnum seedpods and started to draw. I picked them of the stem and draw them one after another. I numbered them on the paper when I draw. And I put tiny tags on each individual pod. I draw 12. 


After that it was time for composing, I redraw them all on transparent paper and started to move them around until I found the best composition. It took me 4-5 days, and one more seedpod, before I was happy.


I transferred it all onto watercolor paper and started to paint. 

To paint a seedpod
I slowly painted one or two seedpods at the same time. Carefully covering rest of the paper with scrap paper so I don’t ruin the paper with color stains or smudge from my hand.

I first lay down one wash with Burnt Umber and immediately took out the highlights. I then painted the first layer on the small seeds. After this had dried properly I erased my pencil lines. 

One more layer of Burnt Umber and more work on the seeds. After that it was all details, I painted with my 00 brush! When I was satisfied with the details, the shadows and the overall outcome I let it dry again. Then I lay on a wash of Raw Sienna, and carefully lifted out the highlights. After that I went over the whole thing one more time and deepened the shadows and make all lines as clear as possible. And fixed things that needed to be fixed.

And then there were 12 more …

I painted the pods behind the rhododendron leaf first, then the rhododendron and after that the seedpod in front of the leaf. I do so because that is the easiest way to get sharp forms. Painting behind an already painted form easily lead to blurred and smudged lines. 

To amuse myself I did not look at the entire picture before everything was painted. I covered up the painted pods as soon they where finished. That mean that there were some correction that needed to be done at the end so everything was connected. 

But it was fun to surprise myself with a bit of mystery painting!

My colorselection for this painting was narrow
My gray was mixed of Perylene Maroon, Prussian Blue and Transparent Yellow.
The brown for the seedpods was Perylene Maroon, Prussian Blue and Burnt Sienna.

Beside this I only used Burnt Umber and Raw Sienna. The seedpods are mostly painted with Burnt Umber and the gray. 
The inside of the rhododendron leafs is painted with Raw Sienna and the outside with Quinacridone Gold. Details with Burnt Umber and the gray.


The painting
Dancing and falling seedpods. From a golden rhododendron leaf.
Tricky to get a good photo though ... But I'm very pleased with my effort this past week.


Monday 6 April 2015

Early April - a year later

Today it is birthday party for this blog - I started it a year ago. And I celebrated it the only way possible - a visit to the dump of course. It was my first visit this year. The weather or the time hasn't been right - and the place is actually not that fantastic during winter. It is only if our MTB take us that way, but of some reasons they haven't this winter. Too many colds and flues has put an irritating stop to that sort of outings.

But today I took my regular city bike and pedal my way to the dump. I put my bike at the bottom of the hill and left it there and slowly walked over the hill to the see what had happened since my last visit.

At the highest point someone has put a sign with name and altitude, always good to know where you are.

All the giant hogweeds are down for the season and new ones are emerging. But today it was possible to see the deers feeding on the grass.

The only flowering things are coltsfoot (Tussilago farfara) and a few Yellow Star-of-Betlehem (Gagea lutea). 
I think I'm bringing the wrong tools for doing good sketches in the field, to few and wrong colors and not the right brush. This setup is good for messy urban sketching, but not for botanical stuff. But I tried at least! And I had an audience of a 5 year old girl who declared "Mom, I want to stay". I told her to go home and paint a flower ... :-)

There are lots of reed growing on the slopes, and they are beautiful this time of year. All swept the same way of the wind, broken and brittle. I took some with me home and painted in the calm of my study.
In the ground beneath all the giants there are lots of shells in wonderful colors. I have never drawn nor painted one so here are my first attempts on them.

Last, the dump showed that it still is ..... a dump. A broken shovel just thrown away ... 

Sunday 29 March 2015

The Acorn story, part 3

Things now happened very fast. And apparently during the nights.

One evening the little stem were still in the curled fashion, but the next morning it had straightened up. Why does it grow during the nights and not during the days when there are at least little daylight (this is early January in Sweden...).


I tried to paint the delicate green stem from a photo, but I did the stem and the leaf far to big.

Only 4 days later the little curl had grow to a big leaf. But then it sort of stopped, so it is still about the same size.

Then there were silence from the acorns. The two other did notning and the time just went by for a month. But suddenly, on the first of February, one of the others started to sprout! But I think it got it all wrong, it sprouted in the bottom part. And after just a few days the sprout dried and shrinked.

I had allmost given up on that acorn so you can imagine how happy I became the other day when I saw it sprouting again - and now in the right end!

So today I gathered my drawing and painting tools and started up my computer so I could look at my reference photos and did a triptyc.

 I think the acorn are happy to be portrayed.


Tuesday 30 December 2014

The Acorn story, part 2


Early october

The larva has left the building and made a small hole on its acorn, two of the others where sprouting. Funny, the sprouts were in different colours, one was greenish and the other pink. And they were actually not that exciting to paint – how do one depict a short stump with no shape satisfying?


2014-10-10

Things then happened very fast over a short period of time. Three of my acorns sprouted but the rest of the lot did nothing. The sprouts grew very fast, you could actually see the changes from one day to another. The sprout looked very different on all three, they are individuals already on this young age. 


2014-10-16

Now it was time to find small glass containers. I had one small jar that suited well, and I had recently found out that the interior design company Svenskt Tenn had a small acorn vase for sale, only 12 cm in height. 
Lucky for me there was a shop here in Göteborg who sold them, so I bought two!

They are very pretty and look so nice on the window sill, I think they could function very well for small flowers as well.

As soon as I put the acorns in their vases they started to grow real roots – fast!


2012-12-06

Time went by and everyone relaxed but the roots grow and grow. It has almost gone 2 months and I was wondering if there should be any oaks germinating?
I made small harness out of paperclips for them, since I thought that they might needed more air underneath.


2012-12-14

But suddenly it happened! On one of the acorns there was a small green bump pressing its way out. I’ll be watching very carefully over the next days. 

3 days later and it is still fighting to get out!


2014-12-30

Stretching up up up, it has really started to grow now. I painted this over two days, and the green small stem had changed over the night.

Its a whirlwind of roots in the vase. It is actually only one thread but it is hard to tell where it start or where it end and the fact that it is only one is a little hard to grasp. So I don't even tried to draw and paint it ... :-)

It will be exciting to follow this little one on its journey to become a tree. Challenge number one could be to keep it out of harms way of the cat. The cat has never tasted oak.


Sunday 30 November 2014

The fall of growth

Working in series is something I never really think of when doing the same object over and over again. But I read from time to time about artists that honor the method of working in series and the outcome of that work.

Now I have done 3 pieces of Rhododendron leafs, after that 3 pieces curled up leafs – and then I needed one more painting so I decided to do 3 pieces of acorns. After the drawing and composing of these 3 last items I realized I was working in series and that the pictures sort of become better and better in composition and the overall thinking around them. Actually, the Monday after the start of the acorns all I was thinking about on my day-job was the acorns and how to proceed with them. Something really started to happen.


Everything started in September with the 30 day challenge. A new object every day, and sometimes the same object a second or a third time. Speed was required since I for the most time only had about 2 hours to work on.

And now this, a series in 3-part pieces. Still there are only objects of the same kind in every piece, but I start to feel that it is time to change that. So now I have to go out and collect some pine needle. They don’t match the acorn as it comes to habitat, but there is not much growing going on beneath an oak. The small mushrooms I found earlier is now gone. But there could be a pine beside …, and the needles seem to be manageable items to start with.

Some days later 

I left the apartment in the quest of finding some pine needles. But first I went to the oaks to see how it really looked beneath them.
I strolled and kicked up leafs, there are really a lot of leafs under an oak, not one or two layers – but lots and lots. To my surprise all of a sudden two tiny tiny white mushroom connected to a little stump of a branch showed up. I was so happy and picked them carefully and put them in the jar I had with me. I found something growing under an oak J

A few steps away the ground laid bare, no leafs, but instead a lilac mushroom and then a brown … They both went into my jar, happy me! I was now satisfied and decided to go and look for the needles. But only a few steps away there was as a big gathering of yellow mushrooms! Now my jar was full.

Later I found pine needles, but it was not that easy as I first thought. There were some big pines, but they had different kind of needles – far too big. I was after the more normal Swedish style, and they are about 5 cm long.

I had planned to finish the last one of the curled leafs this day, but was so happy over my new findings so I started right away with acorns, little mushrooms and needles. 3 hours later my face was hurting since I had concentrated far too hard on the task, and had closed my teeth a little too tight for a little too long time.

The time is running and Monday comes always too soon. I’m already waiting for next weekend.
Later I finished the painting and I’m very happy with the outcome. Next step in evolution for me J


The weekend after

I have now finished my last leaf paintings so now I have spent this day painting my yellow mushrooms in my sketchbook. Maybe I include some of them in the next acorn painting, but they are so big so they will probably take over the whole scene!

I haven’t painted from photos that much before. I miss holding the items in my hand, twisting and turning it round to find the best angel and to see the hidden parts. Now I have to rely on the photos I took a week ago, and do the best from them. But I realize that if I’m going to take photos to paint from – I have to take lots of photos!


Sunday 26 October 2014

An October walk

On a rainy day I took my bike to the recreational area that also holds my Dump. This time my bike did not follow me all the way up, I parked it at a safe distance.

As I approach the Dump they immediately showed up and make a stand, the Giants.  

I took another way then I usually do. This slippery narrow path is another down hill course for the mountine bikers – but there were none out biking today. Instead there were lots of dog people, and that made sense since it was raining cats and dogs from time to time.

On the flat top of the Dump all the high grasses where moved down. The mechanical things at the left hand side is the ski lift. The very tiny dot in the air in the middle just above the forest is a falcon, we saw it this summer also and it is very busy catching preys. Birds of prey are still quite rare in this region of Sweden so we are always very happy when we see them!

And of course, the crow is as ever also present. Keeping an eye on its realm.

I started to walk over the hill inspecting what was left of the summer. And as expected, there were very little left J

The rose shrubs were all covered whit shiny red rosehips, but some of them looked as they were trying to slip out of the red. Are there maybe some insects that do that, or birds?

I had sturdy clothing on so I walked out in the not-so-mowed area where the thistles grow. They were all very wet and miserable and also broken. Summer is definitely over for them. I also found what was remaining of the Iris.

I took some small pieces with me home and later painted them.


Further down the slope I entered the Giant Hogsweed forest. It was an unreal feeling to walk in amongst them. All grey-brown and totally whitered and broken, but on the ground fresh green new ones emerging.

And they are big!!!

 Crashing down.

 Appaling!

The artist with a block …. J

I did a not so good sketch of some Giants, I have to practice a lot more on them before showing. And it is not a very pleasant experience painting outdoor when it rains.

Besides the birds we saw, the wildlife also offered one roebuck and something squeaking in the grass when we walk to cloes. Some small rodent of some kind. And lots of dogs.